
To let users dynamically create or update records, configure your form fields to interact with an existing Data Source.
Auto-Generate Your Form (Time-Saver)
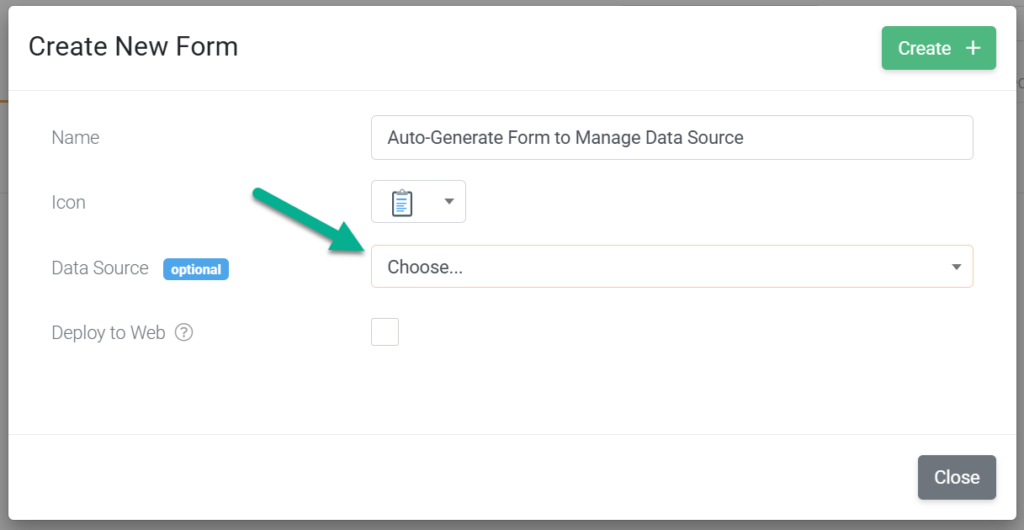
If you are building a new form specifically to manage a Data Source, you can have the platform do the heavy lifting for you!
- On the Forms page, simply select and link your existing Data Source before you click Create.
- When the Form Designer loads, your form will automatically pre-populate.
What the platform does for you:
- It automatically adds a Choices field linked to your Data Source with the Create/Update Row property already ticked.
- It generates a text field for every single column in your Data Source, titled perfectly to match your headers.
- It automatically binds those fields to their respective columns, meaning any edits made in the app will instantly write back to the Data Source.
Tip: The auto-generated fields default to standard Text/Numeric types. If your Data Source contains specialized data (like Dates, Times, or Locations), simply change the field type in the Form Designer before publishing.
Creating and Updating (Manual Setup)
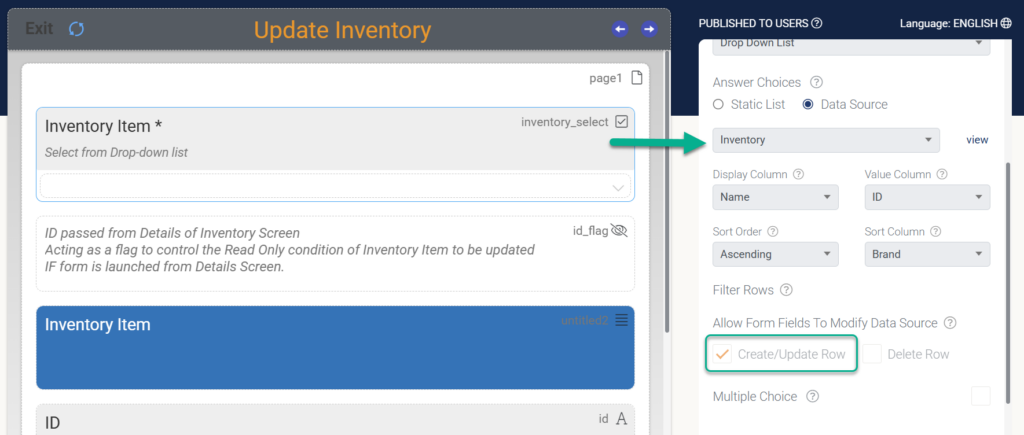
If you need to add this functionality to an existing form instead, follow these manual steps:
- The Setup: Add a Choices or Hidden Data Source field to your form and link it to your target Data Source.
- The Configuration: Tick the Create/Update Row property on that linked field.
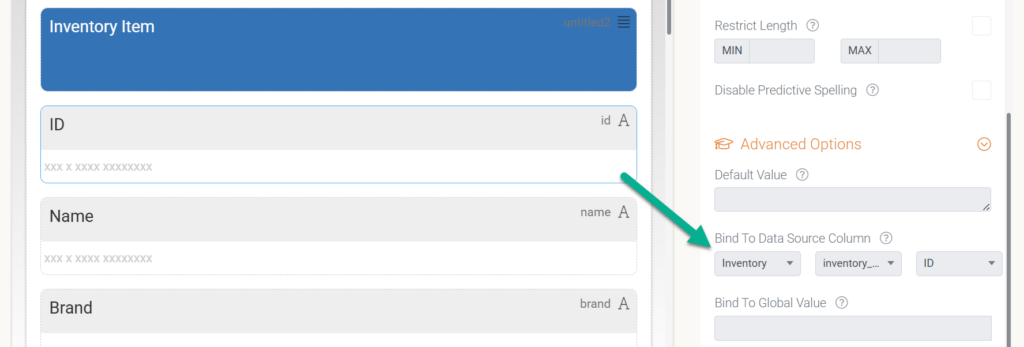
- Binding Data: Add additional fields (like Text or Numeric) and use the Bind to Data Source Column property to map them to specific Data Source columns.
- The Unique ID: Column 0 must always contain a unique identifier. If a user leaves the Choices field blank, the platform automatically generates a unique ID and creates a brand-new row.
Deleting Records Safely
To prevent accidental data loss, deletions cannot happen on your standard data-entry form. You must build a separate, dedicated form specifically for deleting rows.
- Dedicated Form: Create a new form and link a Choices field to your Data Source.
- The Configuration: Tick the Delete Row property on the field.
- Validation: You must bind at least one additional field on the screen to the Data Source’s unique ID (Column 0) so the system can validate the exact row being deleted.
- System Limits: By design, users can only delete one single row per form upload.
Handling Multiple Rows
If you need users to manage multiple rows in a single session, leverage repeatable elements instead of standard fields.
- Repeatable Pages: Place your bound Choices field inside a Page field and tick the Repeatable property.
- Table Fields: Add a Table field, tick Populate From Data Source, and link it to your Data Source with “Create/Update Row” enabled.
The “Dummy Row” Trick
Instead of asking users to leave a dropdown blank to create a new record, you can build a more intuitive “Add New Row” option right into your Data Source.
Target Column | Required Value | What It Does |
Column 0 (ID) | 0 | The platform recognizes 0 as a trigger to generate a new, unique 36-character GUID. |
Column 1 (Label) | Add New Row | Provides a clear, clickable text label for your users in the dropdown list. |
Tip: Set the Choices field Default Value property to 0 and tick Always Show Default Option so this dummy row is always visible to your users.
Platform Replicate Considerations
Platform Replicate Considerations for New Data Source Rows (Advanced)