
If you are looking to provide quick data capture scenarios for users within or outside your organization without requiring them to log in, our Web Forms add-on might suit your needs.
Starting with 250 free monthly submissions aimed at non-regular users of your apps. Web form entries can be submitted via a browser without a user login by staff, guests, or visitors.
Supporting a range of field types for data capture and display for essential solutions on a single page, with up to 50 fields. Web Form links can be shared with anyone to fill out a form and submit it anonymously, triggering internal business processes or simply updating details.
Solutions that were previously impossible are now possible, potentially expanding your organization’s use cases with our platform.
Design Considerations
- Single-page web form
- Max 50 fields per web form
- No location-based data capture (i.e., Location field and field location properties)
- Upload option required (added by default when creating a new Web Form)
- Anonymous form submissions (by Web Form user in Data Feed views)
- Free 250 upload limit per month (thereafter, billable submissions)
Usage Scenarios
Suppose your team requires access to an incident report Form. While some staff members have regular access to the mobile app and can effortlessly submit the incident report Form, others may not need frequent app access but still need to submit the entry. To accommodate these non-regular users, you can generate a Web Form that they can use for submission. The remarkable aspect is that regular app users can submit the same Form directly within the mobile app.
Or, you’re onboarding a new customer and need their details. Send them a Web Form to fill in their details and update your customer data source.
Or, your customer has contacted you to provide service or installation. Send your customer a Web Form to accept a quote, gather more detailed information about what is required, and schedule a suitable time for you to do the job.
To help you better imagine the use cases where web forms can bridge the gap for non-regular users of your apps, we’ve highlighted three use cases below, illuminating some possibilities.
New Patient Medical History | Visitor Registration Form | Service Request Form
Web Form Links
After enabling Web Forms, you can create them in the same way as Data Entry Forms.
Go to App Workshop > Forms and tick the “Deploy to Web” option before creating.
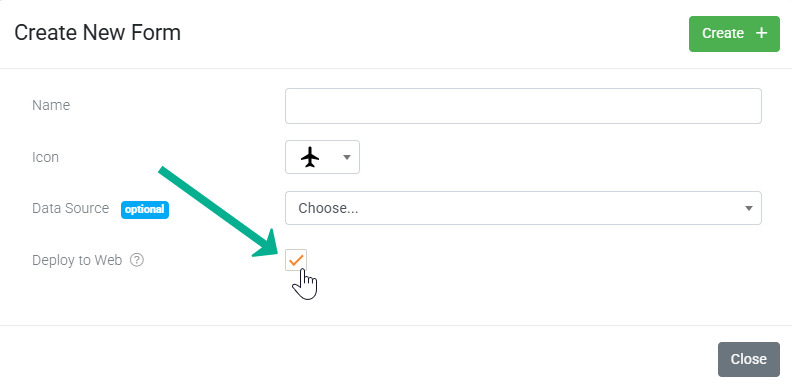
Then, on a Web Form’s designer, on the top right, hit “Manage” to get the form’s test or published link.
Test Link
This link will not change between versions but will stop working when the form is not in test mode.
Published Link
This link will not change if you create new versions of this Form.
Embedding
By default, the web URL will open full-width in the browser. However, embedding a Web Form link in your site and wrapping the URL in an iframe that can control its width is possible.
3 Ways to Resize iFrames in HTML – wikiHow
We do not enforce any limitations on where you can embed your web form URL. However, this may change in the future. As your web form needs to be rendered on our servers before being served, with billable form submissions after the free monthly allowance, we suggest not embedding it on high-traffic websites and adhering to recommended usage to prevent unforeseen costs.
Passing Parameters
Like how you pass parameters from one screen type to another, our platform allows you to pass parameters to a web form for more dynamic behavior. By passing parameters to a web form, you can prepopulate fields and set filtering on a data source that, in turn, drives bound fields to display data and provide a better user experience.
To pass parameters, append a values parameter to the end of your web form URL as shown below:
https://forms.amplus.com/…?values=dataname1:123456|dataname2:hello|dataname3:data3
Providing values via the query string is the same as passing parameters from a User Interaction launching a form.
For Form targets, you can preset target fields with “dataname:value”, pipe-separated.
e.g. field1:123456|field2:hello